Charpy impact testing is a cornerstone of materials science, used globally to evaluate the toughness of metals and help validate the safety and quality of critical infrastructure. By measuring the energy absorbed by a material during fracture, engineers can determine its resistance to brittle failure—a vital metric for everything from pipeline construction to aerospace engineering. However, the accuracy of an impact test is not solely dependent on the quality of the pendulum; it is heavily influenced by the discipline of the laboratory workflow.
The biggest sources of variation in toughness testing often stem from inconsistent specimen preparation, inaccurate notch geometry, and incomplete documentation. Even the most advanced charpy impact machine cannot compensate for a poorly prepared specimen or an unverified notch profile. To ensure your results are repeatable, accurate, and defensible under audit, a standardized setup checklist is essential. By following a rigorous procedure from prep to analysis, labs can eliminate the "human variables" that lead to skewed data. To support this complete workflow, you can explore Charpy impact machine options from Torontech that integrate seamlessly with advanced preparation and analysis tools.
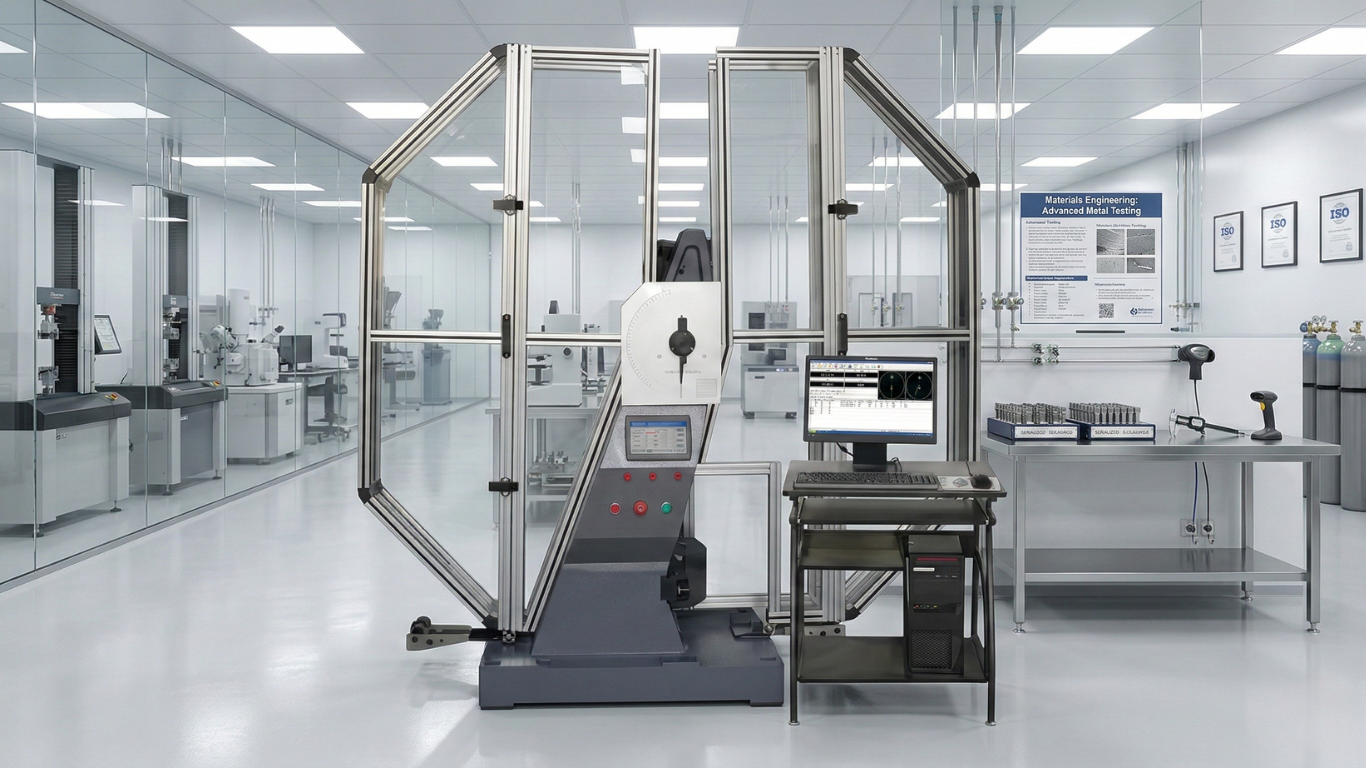
What a Charpy Impact Machine Workflow Includes (Not Just the Tester)
When most people think of impact testing, they picture the heavy pendulum of the charpy impact machine swinging through a specimen. In reality, the actual impact is only a small part of a much larger analytical sequence. A reliable laboratory workflow consists of several distinct phases, each of which must be controlled to maintain the integrity of the final report.
A professional Charpy workflow includes:
- Specimen Machining and Notch Preparation: The physical creation of the test piece according to strict dimensional standards.
- Notch Inspection and Verification: Ensuring the "V" or "U" notch meets the required radius and depth tolerances before the test begins.
- Controlled Test Setup and Handling: Managing the placement of the specimen and, if necessary, its temperature conditioning.
- Impact and Energy Measurement: The actual test performed by the charpy machine.
- Fracture Analysis and Result Documentation: Capturing the visual data from the fracture surface and logging the results with full traceability.
Master Setup Checklist for Charpy Testing
To stabilize your laboratory operations, use the following master checklist to guide your team through every test batch.
Step 1: Define the Test Requirements Before You Cut Specimens
Before a single piece of metal is machined, the parameters of the test must be clearly defined to avoid wasted material and non-compliant results.
- Confirm Applicable Standards: Are you testing according to ASTM E23, ISO 148-1, or a specific internal engineering specification?
- Define Specimen Type: Confirm if the project requires a standard V-notch or a U-notch configuration.
- Define Acceptance Criteria: What is the target impact energy, and what are the reporting requirements (e.g., lateral expansion, percent shear)?
- Determine Temperature Needs: Decide if the test will be performed at ambient temperature or if low-temperature conditioning is required.
Step 2: Specimen Preparation and Notch Broaching Checklist
The notch is the most critical feature of the specimen because it acts as a stress concentrator that initiates the fracture.
- Dimension Verification: Ensure the raw specimen dimensions (typically 10mm x 10mm x 55mm) are within the allowed tolerance of the standard.
- Surface Finish Check: The surface of the specimen should be smooth and free of machining marks that could influence the crack propagation.
- Standardized Notch Broaching: Use a dedicated broaching charpy machine to cut the notch. Broaching is preferred over milling because it provides a more repeatable profile and a superior surface finish within the notch itself.
- Tool Wear Discipline: Establish a schedule to inspect the broaching tool for wear. A dull tool can create a rounded notch bottom, which artificially inflates the impact energy results.
- Traceability: Ensure every specimen is clearly labeled with its batch, heat number, and material condition.
Step 3: Notch Verification Checklist (Before You Test)
Testing a specimen without verifying the notch is a major risk to data quality.
- Profile Verification: Use a notch projector to magnify the notch profile. This allows the operator to visually confirm that the 45-degree angle and the root radius meet the specification.
- Batch Quality Confirmation: If you are testing a large batch, verify a statistically significant number of specimens to ensure the broaching process remained stable.
- Document Pass/Fail Status: Log the verification results for every batch. If a notch is found to be out of tolerance, the entire batch should be quarantined for further inspection. Using a charpy impact machine for metal requires this level of front-end rigor to be effective.
Step 4: Test Setup Checklist (Impact Tester Readiness)
Once the specimens are verified, the charpy impact machine for metal must be prepared for operation.
- Calibration Status: Confirm the machine has a current, valid calibration certificate.
- Configuration Check: Verify that the correct striker (typically 2mm or 8mm radius depending on the standard) is installed.
- Anvil and Support Check: Inspect the support anvils for wear or debris. Even a small piece of metal from a previous test can prevent the specimen from sitting flush, leading to inaccurate energy absorption readings.
- Safety Guards: Ensure all safety enclosures are functional and that the release mechanism is working smoothly.
Step 5: Low-Temperature Conditioning Checklist (When Needed)
Many metals exhibit a "ductile-to-brittle transition" at lower temperatures. Testing at these temperatures is often a requirement for materials used in cold climates or cryogenic applications.
- Controlled Soaking: Ensure specimens are fully submerged in a temperature-controlled bath or chamber for the duration specified by the standard (often 5 to 10 minutes).
- Transfer Discipline: The time between removing the specimen from the cooling medium and the impact must be minimized—usually under 5 seconds—to prevent uncontrolled warming.
- Tool Management: Use cooled tongs to handle the specimens to prevent heat transfer from the operator's hands.
Step 6: Running the Test and Capturing Results
- Consistent Positioning: Place the specimen against the anvils with the notch facing away from the striker, perfectly centered.
- Operational Consistency: Release the pendulum using a standardized motion or automated trigger to ensure no external force is applied.
- Anomaly Detection: If the specimen jams or if the pendulum shows an unexpected "double hit," flag the result immediately as an anomaly for investigation.
Step 7: Fracture Appearance and Result Documentation Checklist
The test doesn't end when the pendulum stops. The information on the broken surface is just as valuable as the digital reading.
- Impact Energy Recording: Log the energy absorbed in Joules (or ft-lbs).
- Fracture Surface Inspection: Classify the fracture as brittle (shiny/cleavage), ductile (dull/fibrous), or a mixture of both.
- Imaging: Use a fracture image analysis tool to capture high-resolution photos of the broken surface for the final report.
- Lateral Expansion Measurement: If required, use a digital micrometer to measure the increase in width at the compression side of the specimen.
Common Causes of Bad Charpy Results (and How to Prevent Them)
- Inconsistent Notch Geometry: This is the #1 cause of data scatter. Small variations in the root radius can significantly change how the crack initiates. Prevention: Use a notch projector for every batch.
- Tool Wear: As the broaching tool dulls, the notch becomes shallower and more rounded. Prevention: Implement a mandatory tool change-out schedule based on the number of cuts.
- Handling Delays: In low-temperature tests, a delay of just a few seconds during transfer can ruin the data. Prevention: Practice the transfer motion and use specialized, pre-cooled tongs.
- Poor Traceability: Losing track of which specimen belongs to which heat lot makes the data legally and technically indefensible. Prevention: Use etched IDs or rigid batch-labeling protocols.
Documentation Template: What to Record for Repeatable Reporting
To ensure your reports meet ISO and ASTM standards, your documentation should include:
- Material Details: Material ID, heat number, batch, and any heat-treatment condition.
- Specimen Specs: Dimensions and notch type (V or U).
- Prep Logs: Identification of the charpy machine used for broaching and the status of notch verification.
- Test Conditions: Ambient temperature or the specific conditioning temperature used.
- Equipment ID: The serial number and calibration date of the charpy impact machine.
- Primary Result: Impact energy in Joules.
- Secondary Metrics: Lateral expansion, percentage of shear fracture, and image references.
- Operational Data: Name of the operator, date, time, and the specific version of the SOP followed.
How Torontech Supports a Complete Charpy Workflow
Quality results require more than just a pendulum; they require an integrated ecosystem of tools. When you compare Torontech Charpy impact testing solutions, you will find that we focus on the entire testing lifecycle.
- TT-PIT Series: High-precision charpy impact machine options designed for both routine QC and advanced R&D.
- Notch Broaching Machines: Automated tools to ensure that your specimen preparation is as repeatable as the test itself.
- Notch Projectors: Essential optical tools to verify notch geometry before the strike.
- Fracture Image Analyzers: Software and hardware to document the fracture appearance for comprehensive reporting.
- Low-Temperature Baths: Reliable conditioning units to support testing across the full temperature spectrum.
Explore Charpy Impact Testing Options From Torontech
Repeatability in the lab is born from discipline and the right equipment. By standardizing your specimen preparation, verifying every notch, and maintaining a rigorous documentation template, you turn a simple impact test into a powerful analytical tool.
The next step in improving your lab's performance is to evaluate your current prep-to-analysis workflow. We invite you to explore Charpy workflow tools and request a quote for the configuration that matches your lab’s throughput and reporting needs. Whether you are upgrading your primary charpy impact machine or adding a notch projector to stabilize your data, Torontech provides the engineering support needed to ensure your toughness testing is world-class.


